A popularly known private bank in India as ICICI Bank Ltd. is the acronym for the Industrial Credit and Investment Corporation of India. ICICI Bank offers its customers the most convenient ways to manage their finances through various customer-friendly banking and financial services.
The ICICI bank customers are allowed to make transactions using Internet banking, mobile app, and funds transfer facilities such as Immediate Payment Service (IMPS), Real Time Gross Settlement (RTGS), National Electronic Funds Transfer (NEFT), and many more options. However, while making transactions, either using the manual/offline or online funds transfer facilities, the user is needed to add a beneficiary or payee to his/her bank account because you cannot transfer the funds to any bank account without adding a Payee to your bank account.
You can add a beneficiary online using your mobile phone or computer. In this detailed blog post, we will discuss the comprehensive information and proper guidance in its most straightforward way, showing you how to add a payee to your ICICI bank account using the “iMobile Pay app.”
What Is A Beneficiary In ICICI Mobile App?, And Why Is It Needed To Add?
You should know that a beneficiary, in banking terms, is an individual or an entity who will receive the transferred funds from a bank account to others’ bank account, and the person who transfers funds from a bank account is a remitter.
When you add a new beneficiary to your ICICI Bank account to transfer him/her funds online, you verify all the details of the beneficiary’s account, such as his/her bank account number, name of the beneficiary, name of the beneficiary’s bank and its IFSC Code, and phone number, etc. so that you can ensure that the funds go to the correct bank account.
After the activation of the beneficiary or payee is complete, the funds are successfully transferred to the intended bank account. However, this entire process of funds transfer can take some time, which depends on the mode of payment, such as IMPS, NEFT, or RTGS, and the cooling period for receiver detail activation in the bank.
You should know that the cooling period in a bank is meant as the time taken by banks during which a money sender cannot transfer the funds to a newly added beneficiary or payee. The cooling period in the bank can range between 30 mins to 4 hrs, or sometimes it may be up to 24 hours, according to the situation.
Steps to Add Payee To ICICI Mobile App
If you are an ICICI Bank account holder and you want to transfer funds online using the “iMobile Pay app.“, then you should have to add a beneficiary or payee to your ICICI bank account. Just follow the below-written simple and easy steps as follows:
Step 1. Download, install, and launch the ICICI Mobile banking app. “iMobile Pay application” from your mobile phone play store and open the app. Then enter all the required details to get logged in, such as your MPIN, User ID, Username or password, etc.
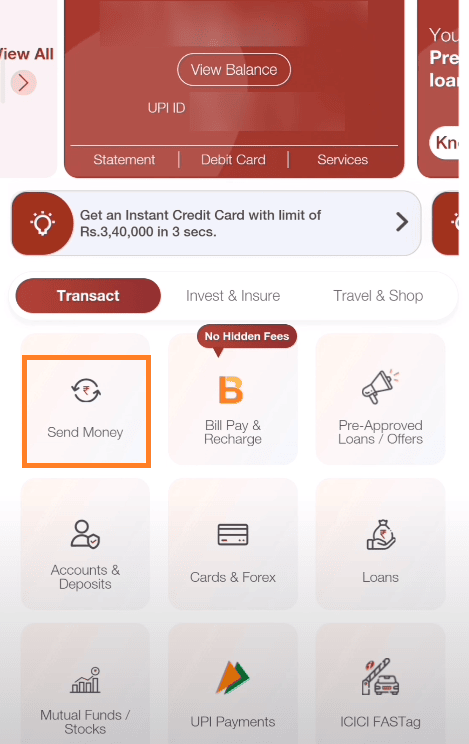
When the logging-in process is done, a new page will open up before you. Here you will see various banking-related options. Click on the “Send Money” option.
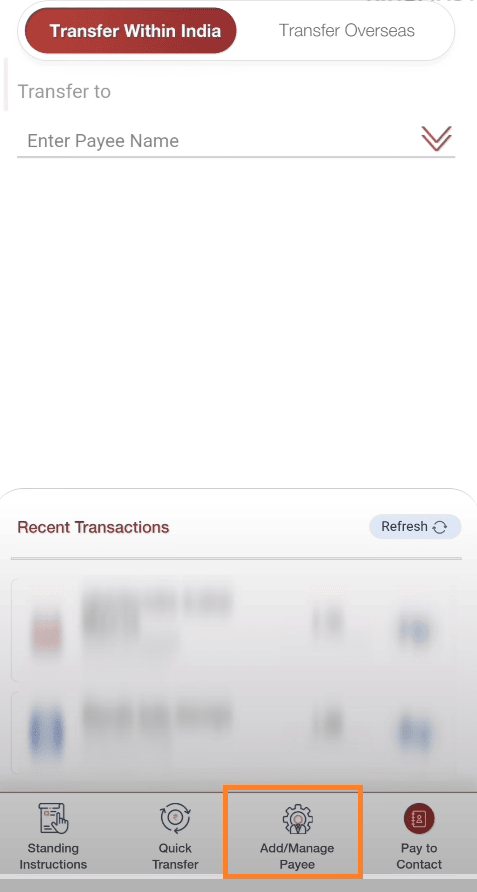
Step 2. Now, a fresh page will open up before you. Here you will see two options. Click on the “Transfer within India” option. Then click on the “Add/Manage payee” option.
Step 3. After that, another new interface will open up before you, showing you the “Add Payee” title. Here you will see two options; “ICICI Bank” and “Other Bank.” If you want to transfer funds to ICICI Bank, then click on the “ICICI Bank” option. Otherwise, you will have to tap on the “ICICI Bank” and “Other Bank” options.
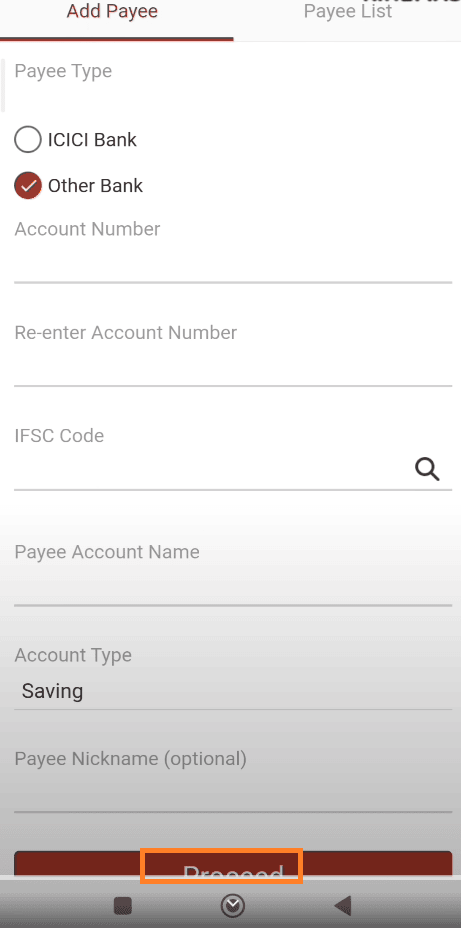
Now, you will need to enter the required information, such as; the beneficiary’s bank account number, re-enter it, IFSC Code, and the name of the beneficiary, then select the type of your account, such as “Savings” or “current,” etc. Then click on the “Proceed” button.
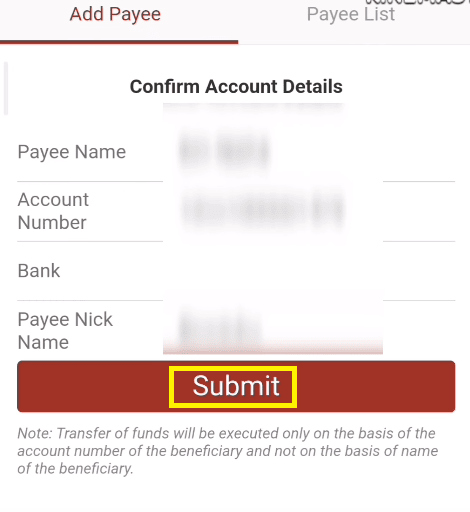
Step 4. After that, confirm the entered account details. If everything’s fine, then click on the “Submit” button.
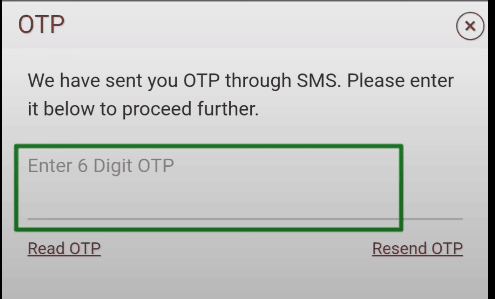
Step 5. You will now receive an OTP number on your registered mobile number. Enter that OTP as required.
Step 6. Now, on a fresh page that opens up, you must enter the amount you want to transfer. Here we are sending 1 rs for the First time. If you are transferring your funds to the “Other Bank” account, then select the transfer type, such as; from one of the three options: “IMPS,” “NEFT,” or “RTGS,” as may be the case, and write a remark for the purpose of funds transfer, such as “Gift,” “Family” or “Bill Payment” etc. Then click on the “Proceed” button.
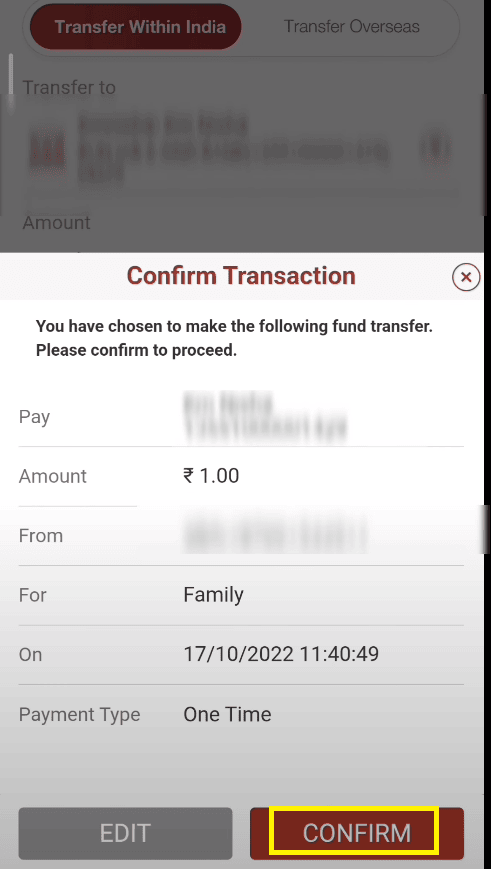
After entering the above details, once again, carefully check all the entries. If everything’s correct, then click on the “Confirm” button. After that, you will receive a message on your mobile phone “Transfer successful.” Click on the “OK” option.
Now, you will see that the name of your beneficiary has been successfully added to the “ICICI Bank” or “Other Bank” category, as may the case be. So this way, you can easily and quickly lear about adding a beneficiary to an ICICI Bank account.
The Top Thoughts As A Conclusion
We can expect that after carefully reading this article till the end and following the instructions described above, you will have learned to add a beneficiary and activate his/her details in the banking system of ICICI Bank.
However, suppose you are still getting confused or having some issues/queries regarding adding a beneficiary to your ICICI Bank account. In that case, you should contact the ICICI Bank’s customer support team at their Toll-Free number: 18001080 from Monday to Friday between 09.00 a.m. to 06.00 p.m. to get appropriate guidance and help for the same.
In addition, you can also try and get in touch with ICICI Bank’s customer support team by dropping an email to: [email protected]. They will help you accordingly to sort out your problem shortly.
 How to Add Payee in Axis Bank Online
 How To Register/Change Mobile Number In ICICI Bank Online
 What are Details Required For What NEFT Transfer?
 How To Add Beneficiary in YONO SBI Online
 ICICI Bank RTGS Form Download in PDF Format
Be the first to comment