YONO SBI is the Retail banking application of the State Bank of India, offered on mobile. It is an all-in-one app that offers various customer-friendly banking facilities/services along with UPI, such as making payments, different recharges, cardless cash withdrawals, etc. You can quickly transfer money using different sections under the YONO Pay option, such as Quick Transfer, YONO cash, Bank Account, BHIM UPI, QR Code, Contacts, Donation, etc.
All the existing users of the Yono Lite SBI app and Internet banking can use the YONO SBI application that is available at the Google Play store for Android devices, Apple App Store for iOS devices, and Microsoft Store for Windows PCs.
While using the YONO SBI Web/App, it is essential that users have a personal or business account number with SBI Bank. , they can also log in to this app using ATM card details. However, they require their mobile numbers to be registered with SBI and linked to their bank accounts so that OTP can be sent to that number.
Suppose you are a State Bank of India customer with a personal or business account. You want to send or receive money using the Unified Payment Interface (or UPI) through your SBI bank account. In such a case, before proceeding further, you will have to create your YONO BHIM UPI ID.
This blog post walks you deeper into the information on the YONO SBI and UPI ID, their significant features and uses, and how you can create a UPI ID in the YONO SBI Application. So stay tuned with us for more information. Let’s get started without wasting any time. But first, understand the details of the UPI ID.
What Is UPI ID, Its Significant Features And Benefits
You can avail of some benefits and get secured by using a UPI ID to transfer funds to the beneficiaries. Let’s look at its noteworthy features and benefits.
Significant Features of UPI ID
- UPI ID, also known as the virtual payment address (or VPA), is the best way to use UPI fund transfer systems, such as BHIM UPI, Google Pay (Tez), Paytm PhonePe, etc.
- The BHIM UPI is the most simple payment method using the UPI ID, as compared to the others. It is a mobile-based fund transfer application.
- While making payments to the real account of the beneficiary, you need the payee’s bank account number and IFSC code. But sometimes, the fraudsters try to cheat the bank customers by using their bank account details. The UPI ID secures customers by eliminating the necessity for exposing their bank accounts.
- The UPI ID is linked to the mobile numbers and account numbers of the bank customers.
Benefits of UPI ID
- You need not expose the beneficiary’s bank account details. So, there remains no threat to the payee from any fraudster.
- You can easily remember the UPI ID in comparison to the beneficiary’s bank account number and IFSC code.
- UPI ID is more secure as you can quickly change it whenever you suspect.
- You can create a UPI ID according to your choice.
- You can quickly verify the beneficiary. As you tap the UPI ID, the beneficiary’s name is produced. At the same time, you can not check the name with the bank account number and IFSC code. This way, the right person is assured of getting payment.
Steps to Create UPI ID in YONO SBI App
In this passage, you will find the straightforward process of creating a YONO SBI UPI ID. So keep reading and follow the below-written easy steps below:
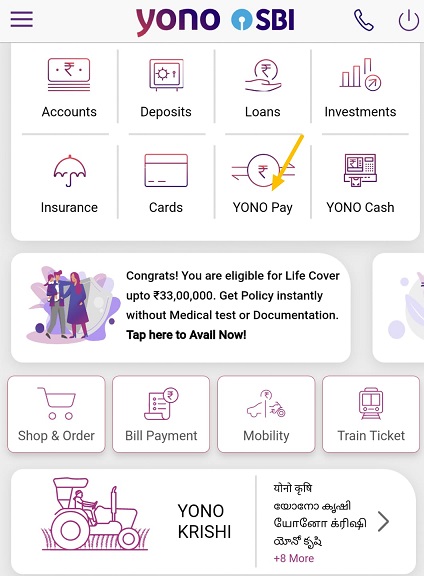
Step 1. Open the YONO SBI app on your mobile phone and log into the app. Click on the “YONO Pay” option on the dashboard.
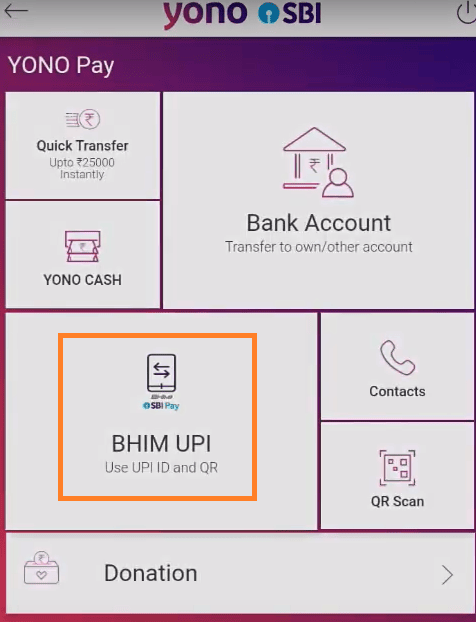
Step 2. Next, Click on the “BHIM UPI” option on the next screen.
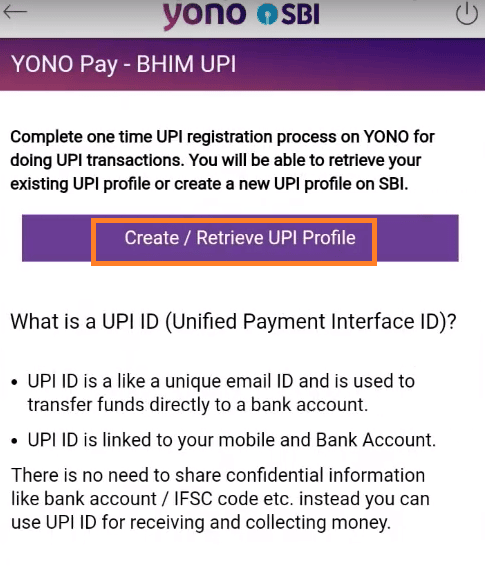
Step 3. Tap on the “Create/Retrieve UPI Profile” option.
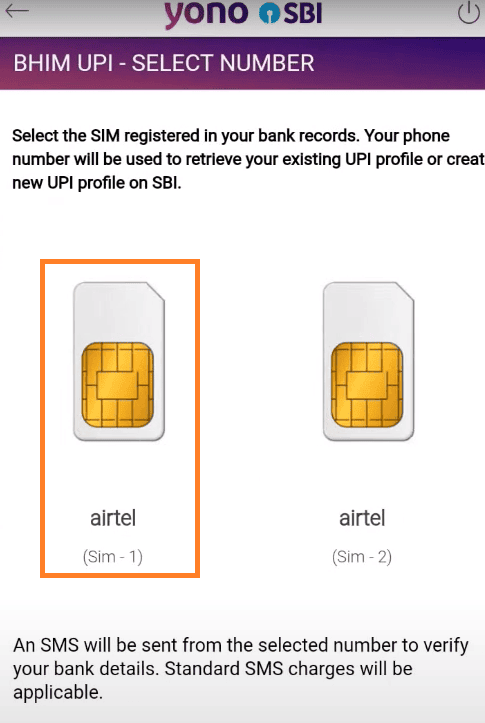
Step 4. Choose the SIM Card with your registered mobile number linked to your SBI account. Your selected SIM card will be verified within 10 seconds. After verification, an SMS will be sent to your registered mobile number to confirm your bank details in SBI.
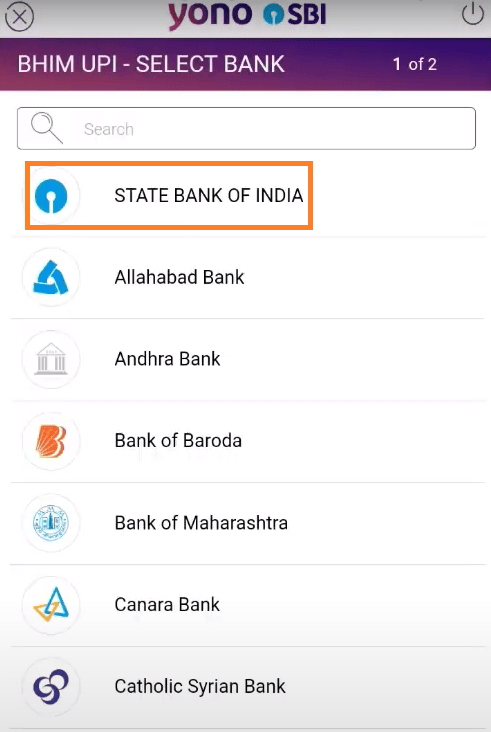
Step 5. Now choose your bank from the list. Here, we are Selecting the State Bank of India from the given list of banks on the screen.
Step 6. Here, you will see three UPI ID options available for you. You can choose one of them or create a new UPI ID after checking the availability of the UPI ID.
For example, to create a new UPI ID, you can choose a ten-digit mobile number with the suffix “@sbi,” like 7985xxxxxx@sbi. Click on the “Check Availability” title. If it is available, go for it; otherwise, create another available UPI ID.
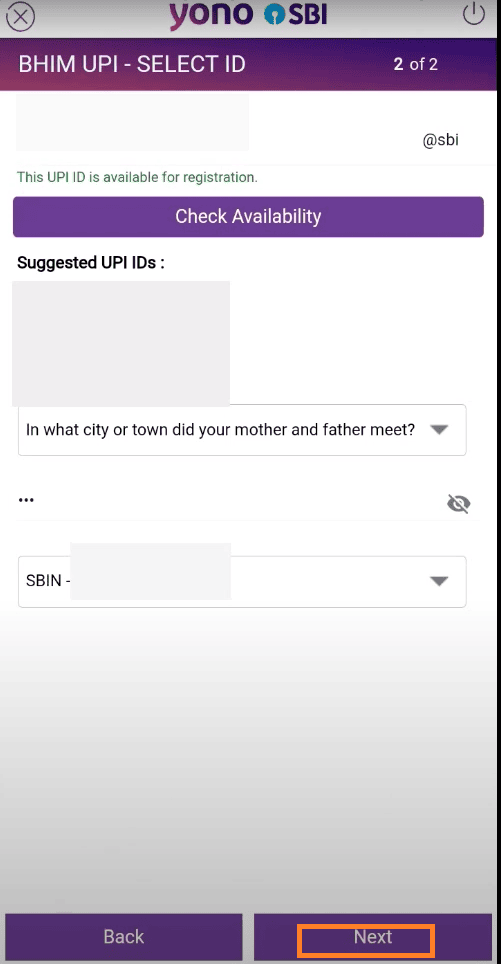
Next, select your “Secret Question” and type the answer to this question as required. Choose the SBI account number you want to link with your SBI Yono UPI ID and click the “Next” button.
After that, you will receive a confirmation message stating that you have successfully created your UPI ID. That’s it. Following the above process, you can quickly understand the process of creating yono upi id.
To Wrap Up
Now you know how to create a UPI ID in your YONO SBI app. By using it, you can experience a sense of security because if you suspect someone can misuse your UPI ID, you can easily change it. However, you can have multiple UPI IDs for various purposes and quickly activate the new UPI ID anytime. Furthermore, you can frequently change your UPI ID just like a password is changed. We have assisted you with the features, benefits, and creation of UPI ID in YONO SBI for hassle-free transactions.
 How To Transfer Money From YONO SBI App
 How to Increase UPI Limit in SBI YONO App
 How To Add Beneficiary in YONO SBI Online
 How to Check YONO SBI Balance Without Login
 What is SBI YONO App, YONO Full Form & Its Features?
 How to Fix YONO SBI Login Problem
 YONO SBI Registration With ATM Card [Without Internet Banking]
Be the first to comment